
Crafternoon with Nina... Hand printed pillow cases
Written by Nina Eberhardt.
Having my sister Eve home for a few days in Tassie was bliss. While most of our time was spent going out for coffee and wine, sunbaking in the backyard and making oh so pretty smoothie bowls, we did get time for a crafter noon! These printed pillow cases are super easy to make and are all printed by hand, so no silk screen or squeegee required! You can make one today and have it looking pretty on your bed by this evening. Get started now!

What you need:
- A set of pillow cases – we used white, but you can choose any colour you like. For best results, use at least 200 thread count. We got ours for half price at Harris Scarfe, only $10 a set!
- Fabric paint – you can buy fabric paint at any art store or at Spotlight. You can buy a good size container for under $10. It may be called textile printing ink or paint, or something similar.
- Cardboard, thick paper or newspaper.
- Whatever you would like to print with- I used a high density foam that came as packaging, it was perfect because it had a smooth surface. You could use balsa wood, smooth cork etc. Eve used a cotton bud to print her dots, or you can use a paintbrush if you would like to draw or write free hand.
- Iron and ironing board.
How to:
Wash, dry and iron your pillow cases.
To stop the ink going through to the back, place a piece of paper, cardboard or newspaper inside the pillow case.
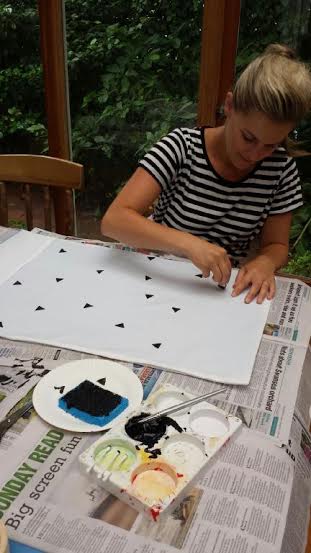
Choose what you will print with… Eve used a cotton bud for tiny dots. I cut some foam into a little triangle. Make sure you use a Stanley knife to ensure smooth edges.
For the dots, simply put some fabric paint onto a plate. If you are stamping, you need to put some paint on a sponge, then use a brush to spread it out. Keep doing this while you are stamping, you want to have enough to cover your stamp but not too much!
Now you are ready to print! Make sure you do a test on a scrap piece of fabric first. Especially if you are printing with a stamp. Have a play around with how much paint you need and how much pressure to use when stamping onto fabric.
Pillow case time! Eve simply dipped her cotton bud in the paint then pressed straight down onto the pillow case. Re dip into the paint for every dot and use a new cotton bud every 10 dots or so.If you are stamping, make sure to re dip your stamp each time, making sure the paint coverage is even and not too heavy. I like to ever so slightly roll the stamp when pressing it onto the pillow case, just to make sure it prints evenly. Remember, as these are handmade, they will never be perfect, but that is part of the charm!
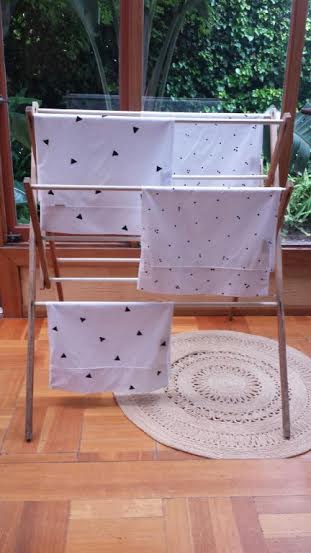
Once you are done, very carefully lay your pillow cases, with the paper still inside, somewhere flat to dry.
Once they are dry, iron them, following the instructions on your fabric paint. I place a thin tea towel over the top, then slowly iron over it for a few minutes, on cotton setting.
Now your pillow cases are ready to use! Pop them on your bed and feel very proud of yourself!


Aside from triangles and spots, there are so many designs you could do...Why don’t you try:
- Crosses.. printed or hand painted
- Clouds
- Writing … Mr / Mrs, Good Night / Good Morning, dream big… anything you like!
- Multi coloured dots
- Hearts
With Love…Nina x
Make sure you Instagram your pillows and tag @dotandpop - Follow Nina on Instagram here
D + P